


Many people ask me questions about rebuilding, so I thought I’d create this page. There’s not a lot of new information here, but I tried to pull information from other sections to this one in order to give you a “one-stop-shop” where you can get your questions answered.
Building takes time, patience, and practice when first getting started. You are working with tiny coils and tiny places where you mount those coils. If you mess up… DON’T SWEAT IT! Just try it again. It get’s easier with time and practice.
Friendly disclaimer… improper builds could leads to shorts or over tasking your battery. This could lead to a battery failure. Battery failure could lead to property or personal damage. Is it likely to happen? NO (with care). Could it happen. YES. So be safe, understand what you’re doing, and do any build or use any electronic cigarette product at your own risk.
Hope it helps!
Safety First
Some things to keep in mind…
- Know the resistance your device can handle.
- Know the amp load of your build.
- Know the amp rating on the battery you’re using (much more important with mechs)
- Have a meter or some other method of checking your resistance before firing.
- Watch our for heat! In our world, heat is a great thing, as long as that heat is at the coil. In our world heat is a bad thing, if that heat is found anywhere else. If your switch is getting hot, if your battery is getting hot, if your device is getting hot (outside of the atomizer of course) you’ve got an issue somewhere. Best bet… STOP USING IT and figure out the problem.
- Regulated devices offer protection. Mechanicals do not. If you’re concerned, you can always add a fuse, such as the VapeSafe.
What You’ll Need (not all will be needed for every build)
- Resistance Wire – Typically Kanthal or Nichrome.
- Non-Resistance Wire – for those builds that require it. Not all do. Examples of devices that require it would be the Odysseus and the Ithaka.
- Wick – There are many different materials and thicknesses. Use what works best for your device, build, and taste. Examples:
- Cable
- Ceramic
- Cotton Hemp Wick
- Ekowool
- Nextel
- Organic Cotton Balls
- Silica
- Stainless Steel Mesh
- Wire clippers.
- Micro screwdrivers.
- Needle nose pliers.
- A torch.
- A rebuildable device.
- A device to fire it.
- A battery. Batteries have different amp ratings. More information on this can be found below.
- IMPORTANT – A multimeter or other device that you can check the resistance of your build on. A build with a short or a very low resistance could lead to device damage, battery venting, or worse yet, personal damage!!
Shorts Happen!
When rebuilding the potential exists for a short. It happens. This is why it’s strongly recommended that you have a multimeter or some other device that will allow you to check your resistance before firing it on your device.
Regulated devices, such as the ProVari will protect you from shorts by displaying and error message and not firing. Mechanicals, however, will not. They will go on happily trying to fire your shorted coil. This is not a good thing. It could potentially lead to your battery venting. This is why it’s best to check the resistance of your build before firing it, especially on a mechanical.
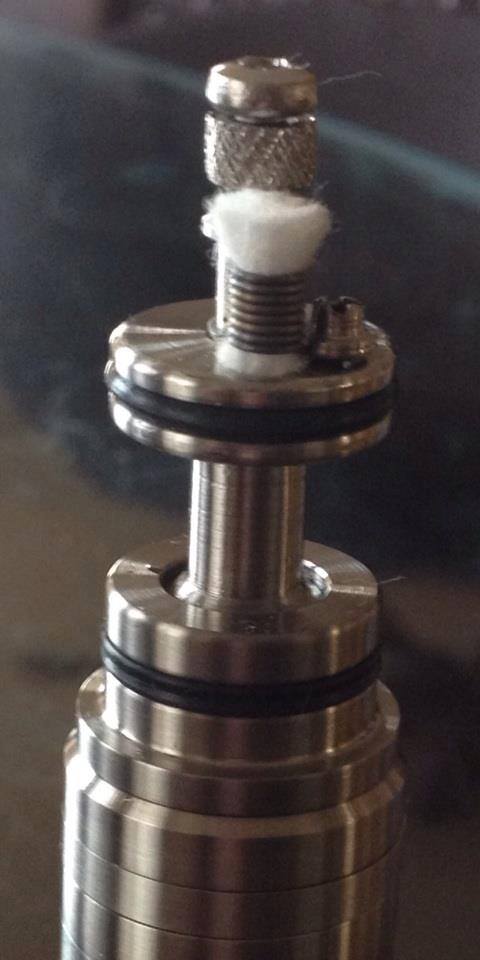
The Wick
What should you use? Well, that depends (but doesn’t it always 🙂 ). It depends on what you like, what you feel comfortable in working with and using, and what works best in the device your building.
Personally, cotton and microcoils go in many of my build these days. The coils last and last and cotton can be easily removed, the coil dry burned, and then re-wicked when the time comes.
You may have a question about what stainless steel mesh to use in your Genesis style atomizer. First, note that it doesn’t have to be mesh. You could certainly use cotton or another type of material. Take a look at this build from my buddy Dino…
But if you are going to use mesh, I’ve had the best luck with 400 or 500. But the rule of thumb seems to be…
- Try lower density mesh (Ex: 200, 270, 325) for thicker e-liquids.
- Try higher density mesh (Ex: 400, 500, 635) for thinner e-liquids.
Why Oxidize?
Ok, so you’ve seen us torch our mesh. Why do we do that? The mesh is stainless steel, stainless steel is conductive. Wrap a stainless steel mesh with resistance wire and you have one giant short. Oxidizing or torching the wick builds up a layer of non conductive oxidation which allows you to fire your coil without shorting it against the mesh. Shorts on mesh are often referred to as “hot spots”. To be plain, these are a pain in the rebuilder’s ass and one of the greatest challenges of setting up a Genesis style atomizer with a mesh build.
There are a few methods you can try to get around this, or fix it should it occur. Here are some ideas. Most of them are contained in the video, “Building a Genesis” which can be found below.
- Start off with an oxidized mesh wick.
- Keep your leads as close to the connection points as possible without having the wick touching those points.
- “Play” with your coil while firing to get rid of the hot spots.
- Use the “Pulse Method” to get rid of hot spots.
- Use the Peter K method to build your coil.
The Resistance Wire
Although Nichrome can be used, I do prefer Kanthal. I personally like the taste better, especially when the coil it breaking in.
I’ve been purchasing A1 Kanthal off of eBay from Temco.
Kanthal A-1 is a ferritic iron-chromium-aluminium alloy (FeCrAl alloy) for use at temperatures up to 1400°C (2550°F). The alloy is characterized by high resistivity and very good oxidation resistance.
Typical applications for Kanthal A-1 are electrical heating elements in high-temperature furnaces for heat treatment, ceramics, glass, steel, and electronics industries.
This is the wire that heats up and vaporizes the e-liquid. It comes in different gauges. Rule of thumb…
- Lower the wire gauge = thicker the wire = lower resistance over a given piece of wire.
- Higher the wire gauge = thinner the wire = higher resistance over a given piece or wire.
So if you want to build a 1 ohm coil, you’ll need more of a 28 gauge wire than you would a 32 gauge.
How do you know what to use? Depends on the build, what you like to work with, and how much room you have. For example, if you want to build a 2 ohm coil and you have a TINY place to work in, 28 gauge may not be right for you. You may need to use a smaller diameter wire in order to get your resistance up to where you want it in the space you have available.
Personally, I’ve been using a lot of 28 gauge these days. It works well in the devices I have, and the increase in diameter makes it snap less easily in the event I’m working out hot spots and wind up with a short.
What about braided or ribbon wire? They can certainly be used. Personally, I’ve experimented with them, but have never seen the need for them so I don’t have the experience to talk about them here.
To help you get an idea of how much wire will be required, I created an Excel spreadsheet that calculates the amount for you. It only covers a few gauges, but it may be helpful to you. Note that the specifications of the wire on the Ebay listings were not used. They appear to be off. I made resistance measurements that are used in the calculations.
You’ll need to download it and have Excel to run it.
You can download it HERE.
For those of you who don’t have Excel, here’s a quick table I did:
WIRE LENGTHS IN INCHES
| GAUGE WIRE | ||||
| 34 AWG | 32 AWG | 28 AWG | ||
| TARGET RESISTANCE Ω | 3 | 1.62 | 2.50 | 5.45 |
| 2.5 | 1.35 | 2.08 | 4.55 | |
| 2 | 1.08 | 1.67 | 3.64 | |
| 1.5 | 0.81 | 1.25 | 2.73 | |
| 1 | 0.54 | 0.83 | 1.82 | |
| 0.5 | 0.27 | 0.42 | 0.91 | |
| 0.2 | 0.11 | 0.17 | 0.36 |
Dual Coils (OR MORE)
Most dual coil builds are done in parallel and NOT series. Ok, what the hell does that mean?
It means this…
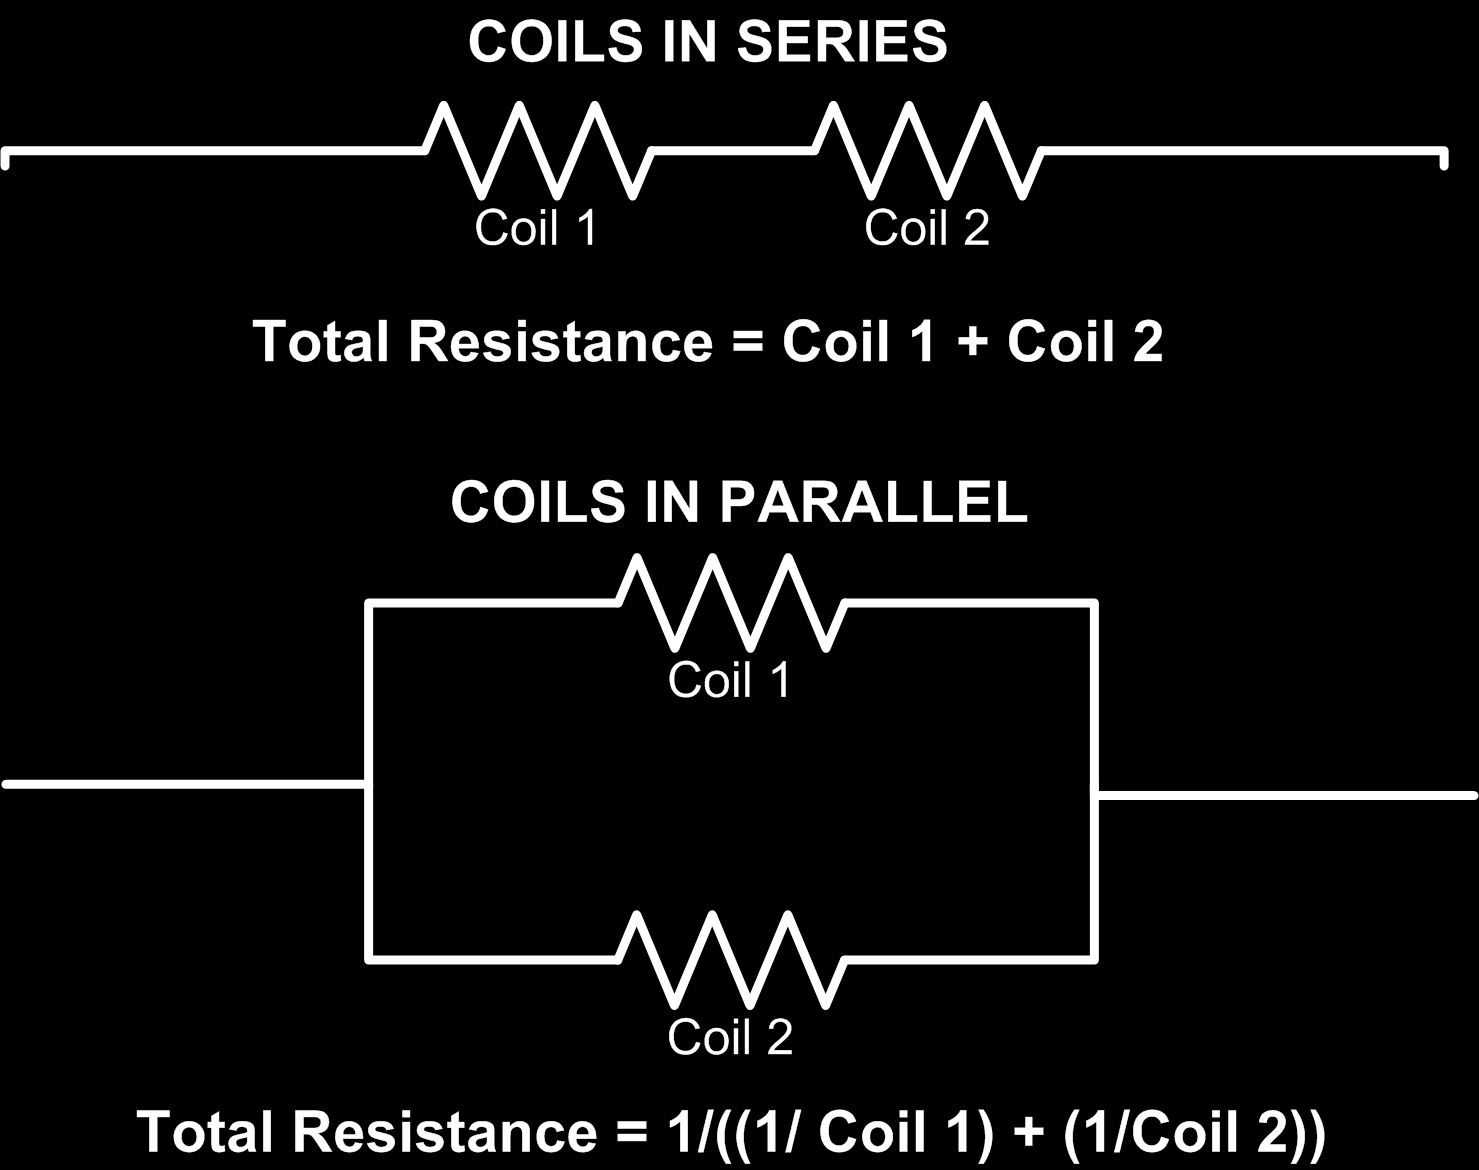
A quick note about the second formula seen above in the diagram. I created that based on ANY two coils or resistance loads. But that’s not how we do things. We should be building coils of the SAME resistance load. The formula is much simpler for two coils of the same load…
Total Resistance = (Coil 1 + Coil 2) / 4
Bottom line… you don’t just add your coil resistance together to get your total resistance, that would be the formula for coils in series on top. You use the formula for parallel coils instead.
Actually, you don’t even have to do that. There are plenty of websites that will calculate that value for you. You can find one of them HERE.
Just keep in mind that when working in parallel, .5 ohms + .5 ohms does NOT = 1 ohm! It actually equals .25 ohms!
Why Non-Resistance Wire?
Some builds require the use of resistance wire / non-resistance wire joins. First, let’s be clear, there is really no such thing as non-resistance wire. All wire has some resistance which is why it will add a little to your build. For example, 30 gauge nickel has a resistance of .6 ohms per foot.
Most builders will use nickel wire, however silver can also be used.
So why might you need it? The resistance wire gets hot. The non-resistance wire does not. This allows you to target where the heat goes and keep the heat away from the parts of the atomizer where you don’t want it.
There are a couple join methods I’ve used in my builds. The first is the twist-fold-wrap method that can be seen in this video:
Building the GG Odysseus:
The other is with the use of a wire joiner or welder, or zapper, or whatever you’d like to call it. These are devices that shoot a high voltage through two wires and basically welds them together.
You can see one in action in this video which contains the TSAF joiner. Note that this is the version 1 of the TSAF, there is now a version 2 available:
The Device
Your build may need to be tailored for the target device you’ll be firing it on. For example, many regulated devices such a the ProVari, the Vamo, the Vmax, the SID, the eVic, or the SVD have amp limitations. These limitations will prevent you from firing a build with too low a resistance OR they will regulate your setting down to what it can handle. So it’s important to know what the minimum resistance your device is capable of if you want to build a lower resistance coil.
Some suggestions:
- ProVari and some other regulated devices = 1.4 ohm and higher
- DNA-20 powered devices = 1 ohm and higher
- DNA-30 powered devices = .5 ohms and higher
- Mechanicals = no limit, BUT BE CAREFUL!
I have a mechanical. Why do I need to be careful?
Most regulated devices have built in protection, amp limitations, and battery monitoring. So even if your build has a short, or is at a very low resistance, a regulated device will prevent bad things from happening.
Mechanicals are mindless little buggers! They don’t care what your resistance is. They will just happily provide power to your build be it 100 ohms or be it a dead short. So if your build’s resistance is too low for what the battery can handle, you have the potential for battery failure. Not good.
The Battery
When using a mechanical, it’s important to know what your build will require in amps and what your battery can give you.
Different batteries have different amp ratings. It’s very important that NOT to exceed the amp rating of your battery. This is much more important when it comes to mechanicals.
To give you an idea of what amp rating you’ll need I did these tables for you.
AMPS
| Coil Resistance Ω | ||||||||
| 3 | 2.5 | 2 | 1.5 | 1 | 0.5 | 0.2 | ||
| Applied Voltage | 3 | 1.00 | 1.20 | 1.50 | 2.00 | 3.00 | 6.00 | 15 |
| 3.7 | 1.23 | 1.48 | 1.85 | 2.47 | 3.70 | 7.40 | 18.5 | |
| 4 | 1.33 | 1.60 | 2.00 | 2.67 | 4.00 | 8.00 | 20 | |
| 4.2 | 1.40 | 1.68 | 2.10 | 2.80 | 4.20 | 8.40 | 21 | |
| 5 | 1.67 | 2.00 | 2.50 | 3.33 | 5.00 | 10.00 | 25 | |
| 6 | 2.00 | 2.40 | 3.00 | 4.00 | 6.00 | 12.00 | 30 | |
| Coil Resistance Ω | ||||||||
| 3 | 2.5 | 2 | 1.5 | 1 | 0.5 | 0.2 | ||
| Applied Wattage | 7 | 1.53 | 1.67 | 1.87 | 2.16 | 2.65 | 3.74 | 5.92 |
| 8 | 1.63 | 1.79 | 2.00 | 2.31 | 2.83 | 4.00 | 6.32 | |
| 9 | 1.73 | 1.90 | 2.12 | 2.45 | 3.00 | 4.24 | 6.71 | |
| 10 | 1.83 | 2.00 | 2.24 | 2.58 | 3.16 | 4.47 | 7.07 | |
| 11 | 1.91 | 2.10 | 2.35 | 2.71 | 3.32 | 4.69 | 7.42 | |
| 12 | 2.00 | 2.19 | 2.45 | 2.83 | 3.46 | 4.90 | 7.75 | |
| 13 | 2.08 | 2.28 | 2.55 | 2.94 | 3.61 | 5.10 | 8.06 | |
| 14 | 2.16 | 2.37 | 2.65 | 3.06 | 3.74 | 5.29 | 8.37 | |
| 15 | 2.24 | 2.45 | 2.74 | 3.16 | 3.87 | 5.48 | 8.66 | |
| 16 | 2.31 | 2.53 | 2.83 | 3.27 | 4.00 | 5.66 | 8.94 | |
| 17 | 2.38 | 2.61 | 2.92 | 3.37 | 4.12 | 5.83 | 9.22 | |
| 18 | 2.45 | 2.68 | 3.00 | 3.46 | 4.24 | 6.00 | 9.49 | |
| 19 | 2.52 | 2.76 | 3.08 | 3.56 | 4.36 | 6.16 | 9.75 | |
| 20 | 2.58 | 2.83 | 3.16 | 3.65 | 4.47 | 6.32 | 10.00 | |
| 21 | 2.65 | 2.90 | 3.24 | 3.74 | 4.58 | 6.48 | 10.25 | |
| 22 | 2.71 | 2.97 | 3.32 | 3.83 | 4.69 | 6.63 | 10.49 | |
| 23 | 2.77 | 3.03 | 3.39 | 3.92 | 4.80 | 6.78 | 10.72 | |
| 24 | 2.83 | 3.10 | 3.46 | 4.00 | 4.90 | 6.93 | 10.95 | |
| 25 | 2.89 | 3.16 | 3.54 | 4.08 | 5.00 | 7.07 | 11.18 | |
| 26 | 2.94 | 3.22 | 3.61 | 4.16 | 5.10 | 7.21 | 11.40 | |
| 27 | 3.00 | 3.29 | 3.67 | 4.24 | 5.20 | 7.35 | 11.62 | |
| 28 | 3.06 | 3.35 | 3.74 | 4.32 | 5.29 | 7.48 | 11.83 | |
| 29 | 3.11 | 3.41 | 3.81 | 4.40 | 5.39 | 7.62 | 12.04 | |
| 30 | 3.16 | 3.46 | 3.87 | 4.47 | 5.48 | 7.75 | 12.25 | |
To give you an idea of what some batteries are capable of:
AW IMR
- 18650 2000mah 10Amp CDR
- 18650 1600mah 24A
- 18490 (1100mah) 16.5A NOTE – I’ve seen this cell listed at 8C as well which gives us 8.8A. Can anyone confirm this value?
- 18350 (700mah) 6A
MNKE IMR
- 18650 1500mah 20A
Panasonic or Orbtronic hybrid
- CGR18650CH (IMR/hybrid) 2250mAh 10A
- NCR18650PF (LiNiCOMnO2) INR/ICR/IMR Hybrid 2900mAh 10A
- NCR18650PD (LiNiCoAl) 2900mAh 10A
- Orbtronic 18650 SX22 (hybrid) 2000mAh 22A
Sanyo
- UR18650EX 2000mAh 20A
Samsung hybrid (LiNiCoMnP)
- INR18650-22P 2200mAh 10A
- INR18650-20R 2000mah 22A
Sony hybrid
- us18650v3 IMR 2250mAh 10A
- us18650vct3 1600mAh 24A
- us18650vtc4 2100 mAh 34A
EH IMR
- 18650 2000 mAh 16A
- 18650 1500 mAh 22A
- 18500 1100 mAh 8.8A
- 18350 800 mAh 6.4A
Efest IMR
- 18650 (IMR/hybrid) 2250mAh 10A
- 18650 2000mAh 10A
- 18650 1600mAh 30A
- 18490 1100mah 8.8A
- 18350 800mah 6.4A
Ok! Let’s Build!
Finally, let’s do some building. I’ve copied a few of my videos here that contain a few of my builds.
Are these the most advanced builds out there? No, they’re not. However, they are more basic builds I use on a daily basis which make me a very happy vaper.
Rebuilding the Vivi Nova:
Rebuilding the EVOD (also works with other Kanger single coil heads):
Building a Genesis (note this is done on a AGA, but you should be able to follow this for most Genesis Atomizers):
Building a Kayfun:
Building a Taifun:
I hope some of this information helps you out! If you’d like to see additional information here, or have any corrections for me, please feel free to contact me!


125x125.jpg)